
How to Prepare Artwork for Precision Engraving on Plastic Sheets
How to Prepare Artwork for Precision Engraving on Plastic Sheets
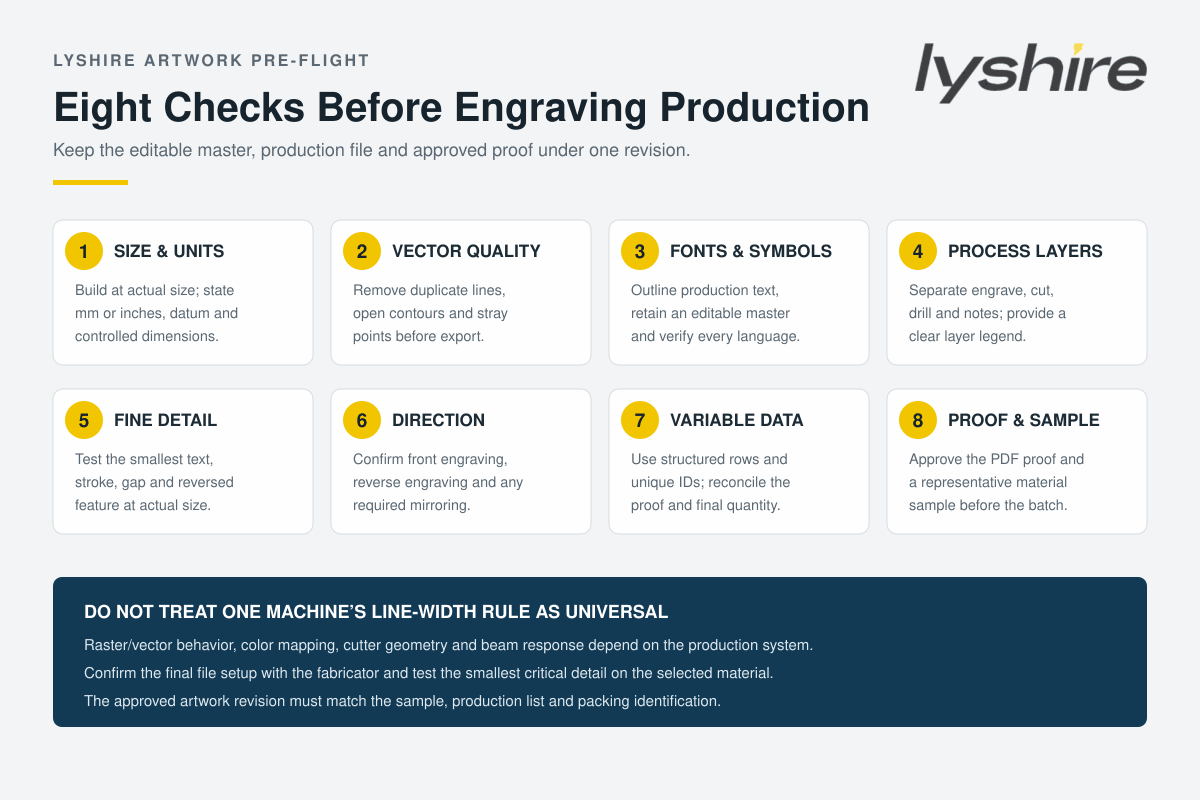
Engraving artwork preparation for plastic sheets starts with a controlled file, not with a machine setting. Buyers and fabricators should connect the editable master, production file, proof, material, process layers, dimensions and variable-data list under one approved revision.
Quick answer: build engraving plastic artwork at actual size, state the units, use clean vectors for geometry, retain an editable master, outline fonts in the production copy, separate engraving and cutting operations, confirm front or reverse direction, check variable data, and test the smallest critical detail on the selected material before batch production.
Treat artwork as a manufacturing specification
An attractive screen preview can still produce the wrong label. A missing font may substitute without warning, a duplicated path may cut twice, a file may open in the wrong units, or engraving and cutting objects may be assigned to the same process. Precision engraving artwork must therefore communicate both what the finished part should look like and how each object should be processed.
The production package should identify the part number, drawing number, revision, scale, units, finished dimensions, face/core color direction, material route and quantity. The digital proof should use the same source as the production file. If a customer approves a screenshot while the operator uses a different file, the approval trail is broken.
Keep three related records: an editable master containing live text and construction history; a locked production copy prepared for the selected system; and a human-readable PDF proof showing dimensions, text and revision. The file names should make their relationship obvious.
Choose vector or raster content by function
Vector artwork describes lines, curves and shapes mathematically, so it can be resized without the pixelation associated with a low-resolution bitmap. This makes vector files for engraving suitable for cut contours, holes, borders, logos, outlined text and other controlled geometry. Raster images are built from pixels and are commonly used for photographs, textures or shaded engraving.
Epilog’s official raster-versus-vector guidance explains that raster graphics and vector fills are normally engraved, while sufficiently thin vector lines may be interpreted as cutting paths by its software. The numerical threshold shown by one equipment supplier is not a universal standard. The operator must use the production machine’s manual, driver and workflow.
A high-resolution raster image may be suitable for a tonal graphic, but converting a blurred screenshot into a larger file does not recreate missing detail. If a logo must have controlled edges, request the original vector artwork. Automatic tracing and the complete laser engraving file setup should be inspected for excessive nodes, broken shapes, unintended holes and distorted lettering.
Keep the editable master before outlining fonts
Font availability is a common source of production differences. If the receiving computer does not have the same typeface or version, live text may reflow, change character width or substitute another font. Adobe explains that converting text to outlines turns the characters into vector shapes, but the text then loses its normal editing properties.
For this reason, retain one editable master with live text and create a separate production copy with approved text converted to outlines. Do not overwrite the only editable source. Include a readable PDF proof so spelling, numbers, symbols, accents, Arabic or other language characters can be checked visually.
Gravotech distinguishes outline fonts and engraving/cutting fonts and notes that font licensing also matters when engraved goods are sold. The buyer or artwork owner should confirm the right to reproduce commercial fonts, logos and symbols. Converting a font to paths does not create a license.
Build the file at actual size and declare units
Prepare precision engraving artwork at 1:1 scale whenever practical. State whether the file uses millimetres or inches, and place at least one controlled dimension on the proof. A 100 mm plate opened as 100 inches creates an obvious error, but subtler scale conversions can change text size, hole clearance and edge margins without being noticed.
Define the finished width, height, thickness, corner radius, hole diameter, hole centre positions and any slots or cutouts. Use a clear datum rather than dimensioning the same feature from several inconsistent references. If a panel opening or fastener pattern is critical, provide the mating drawing or approved sample.
Do not rely only on a page boundary to represent the finished contour. Place the cut path on a named layer and show the final dimensions separately. Remove hidden objects outside the work area unless they are intentional production notes.
Separate engraving, cutting, drilling and notes
Color mapping and layers can help an operator assign different processes, passes or settings. Epilog documents color mapping as a vector-artwork workflow for multiple operations, while Gravotech software supports layer management, toolpaths by color, matrix work and variable lists. The exact color names and line widths still depend on the selected production system.
Use clearly named layers such as ENGRAVE, CUT, HOLES and NOTES, and include a small legend. Production notes, dimensions and registration marks should be set so they cannot accidentally run as artwork. If both raster engraving and vector cutting are required, state which objects belong to each process.
Inspect the geometry for duplicate paths, open contours, self-intersections, tiny fragments and overlapping objects. A duplicated cut line can cause an unnecessary second pass; an open contour may prevent a shape from being recognized as intended. Expand complex effects or clipping masks only after checking that the result remains faithful and machinable.
Confirm front engraving, reverse engraving and mirroring
Standard two-ply face engraving removes the top layer from the visible side to expose the contrasting core. Reverse-engraving materials are processed from the back of a clear face and may require mirrored artwork so the text reads correctly from the front. These are different constructions and should not be treated as interchangeable file directions.
Write FRONT ENGRAVE or REVERSE ENGRAVE on the production note and show the expected reading direction on the proof. Do not mirror an entire job automatically because one component is reverse engraved. Logos, asymmetric symbols, arrows and multilingual text should receive a visual direction check before approval.
For LYSHIRE projects, identify the material model and face/core structure together with the file direction. See the LYSHIRE engraving sheet structure system for the difference between surface and reverse configurations.
Test minimum text, strokes, gaps and reversed detail
There is no universal minimum text height or line width for every engraving plastic. The result depends on the material’s face layer, contrast, finish and thickness; the laser beam, lens and focus; or the cutter geometry, sharpness, runout and engraving depth. Filled text, single-line text and reversed text also behave differently.
Create a representative test containing the smallest character, thinnest stroke, narrowest gap, tightest inside corner and smallest reversed feature used in the real job. Engrave it at actual size on the intended material. Inspect whether counters remain open, adjacent strokes stay separate, the core is exposed consistently and the final label is readable at the required distance.
Do not approve only the largest or easiest label in a mixed order. The production sample should challenge the process at its most critical detail. If several material colors or finishes are included, test combinations whose contrast or surface behavior may differ.
Prepare CNC and rotary geometry for the actual cutter
CNC engraving artwork requires more than a visible outline. The cutter has a physical tip geometry, so very tight inside corners, narrow gaps or thin strokes may not reproduce exactly as drawn. A toolpath may follow the centreline, offset from a contour or clear a filled area depending on the software and operation.
Supply clean vectors and let the fabricator confirm tool choice, offsets, depth and machining strategy. Do not pre-compensate unknown cutter geometry by randomly thickening text. If a particular finished stroke width or pocket dimension is controlled, place that requirement on the drawing and approve a test.
LYSHIRE’s standard ABS configuration belongs to the CNC/rotary route. CO2 laser projects normally use the separate PMMA/acrylic-based configuration. Review the LYSHIRE processing system before preparing one file for multiple material routes.
Control variable text, serial numbers and codes
Variable data engraving needs a structured source rather than individually renamed artwork files. Use one row per finished part with a unique ID, exact text and any barcode or QR-code payload. Keep leading zeros as text where they are significant, and define whether spaces, hyphens and capitalization are part of the encoded value.
Before production, reconcile the row count, requested quantity and generated proof. Check the first, last and representative middle records, plus any long values or non-Latin characters. If codes must scan, define the data content, expected code type, finished size, quiet area and verification method; then test the code after engraving on the actual material.
Variable content should not be manually retyped at the machine. If a correction is necessary, update the controlled data source, issue a new revision and regenerate the proof so the change remains traceable.
Recommended production file package
| File or record | Purpose | Important checks |
|---|---|---|
| Editable master | Future text or layout changes | Live text retained, linked assets included, correct color space and file ownership |
| Production vector file | Geometry supplied to engraving software | Outlined fonts, clean paths, actual size, named process layers and no unintended objects |
| PDF proof | Human review and approval | Part number, revision, dimensions, wording, direction, colors and quantity |
| Variable-data table | Serial numbers, names, codes or tag lists | Unique ID, protected leading zeros, row count, encoding fields and revision |
| Material/process specification | Connect artwork to production route | ABS/CNC or PMMA/laser, colors, finish, thickness, backing and environment |
| Approved sample record | Physical acceptance reference | Smallest detail, contrast, dimensions, cut quality and approved date |
Common exchange formats include AI, EPS, PDF, SVG and DXF, while raster content may arrive as PNG, TIFF or high-quality JPEG. File extensions alone do not guarantee usable content—a PDF can contain only a low-resolution image, and an SVG can still contain live fonts or unsupported effects. Confirm the preferred format and software version with the fabricator.
Common artwork failures and corrective checks
| Production symptom | Artwork items to review |
|---|---|
| Text changes after file transfer | Missing fonts, live text, language support, font version and outlined production copy |
| Part engraves or cuts twice | Duplicate paths, overlapping objects, hidden layers and repeated imported geometry |
| Cut contour does not close | Open nodes, broken joins, self-intersection and export conversion |
| Reverse text reads backwards | Material construction, viewing side, mirroring instruction and proof direction |
| Fine details merge or disappear | Actual-size test, stroke/gap, fill type, beam or cutter, depth and material face layer |
| Variable labels are missing or repeated | Row count, unique IDs, filters, manual edits, proof generation and packing reconciliation |
Process boundary: do not copy line-width thresholds, color maps, laser settings or cutter compensation from another machine without verification. The correct artwork preparation depends on the production software, equipment, tool, material, geometry and required result.
RFQ checklist for artwork review and sample production
Send LYSHIRE the editable artwork or clean vector file, PDF proof, finished dimensions, units, drawing revision, label list, smallest text, face/core colors, finish, thickness, ABS/CNC or PMMA/CO2 laser route, holes and contours, front or reverse direction, variable-data source, backing, quantity and required sample approval.
If finished parts are requested, identify packing groups and part numbers so production can be reconciled to the label schedule. For unusual geometry, multilingual layouts or special backing, review LYSHIRE custom applications.
Frequently Asked Questions
Should fonts be converted to outlines before engraving?
Convert approved text in the production copy to outlines to reduce font-substitution risk, but retain a separate editable master because outlined text is no longer normally editable as text.
Is a PDF always a vector production file?
No. A PDF may contain vectors, raster images, live fonts or a mixture. Inspect its contents and confirm the fabricator’s preferred production format.
Can one minimum line width be used for every engraving machine?
No. Line interpretation and reproducible detail depend on the machine, driver, material, optic or cutter, and processing method. Test the smallest critical feature.
When should artwork be mirrored?
Mirror artwork only when the selected reverse-engraving construction and viewing direction require it. Confirm the expected front view on the proof.
How should serial numbers and variable data be supplied?
Use a structured table with one row per part, a unique ID, exact value and controlled revision. Reconcile the row count and generated proof before production.
Which material route should the file specify?
State ABS for LYSHIRE’s standard CNC/rotary route or the separate PMMA/acrylic configuration for CO2 laser processing, together with colors, finish and thickness.
Request an Artwork and Sample Review
Send LYSHIRE the vector file, proof, dimensions, material route, smallest detail and quantity. The technical team can review the artwork package and representative sample requirements before production.
Contact LYSHIREArtwork references: Epilog raster versus vector guidance, Epilog color mapping, Adobe text-to-outline guidance, Gravotech engraving font guide and Gravotech software and variable-list capabilities.